Showing posts with label organization. Show all posts

14 June 2022

7 Days to a Better Family Tree

Each week I offer advice on how to fortify your family tree. But because my pet genealogy project is so massive and enjoyable, I rarely make the time to follow my own advice.

Today I'm offering a method that'll help us make noticeable progress on our family tree goals. The idea is simple. The next 7 days you decide to work on your family tree, pick one of these goals and work on only that one thing. No distractions allowed.

With any of these items, keep track of where you left off so you can return to complete the job.

Here are some of the tasks I've been ignoring for a while. What would you add to, or substitute in this list?

Day 1: Create charts to show you who's missing.

When I wanted to search for the eldest ancestors on any given line of my family tree, I created a fan chart. This showed me exactly which set of ancestors to focus on. See "Search the Treetops to Focus Your Genealogy Research."

Or make your Ahnentafel chart to see how many direct ancestors you've found, and who's missing. See "How to Visualize Your Ancestor-Finding Progress."

Spend a day trying to find those missing direct ancestors in your family tree.

And of course there's the priceless (and free) Family Tree Analyzer. See "How to Plug the Holes in Your Family Tree" and learn how to use FTA to focus on who and what your family tree is missing.

Day 2: Go after missing censuses.

When they released the 1950 U.S. census in April, I got busy. I searched for and downloaded documents for my closest relatives. Then I moved on to higher priority projects.

We can gather missing censuses more thoroughly if we stick to a plan. My plan hinges on my document tracker. It's a spreadsheet where I mark down every document image I've saved to my family tree. (Download a copy for yourself at the bottom of "Why Use a Genealogy Document Tracker?")

When your document tracker is ready, you can see which census years are missing. Scan your tracker to see which families you have in the 1940 census that you need to find in the 1950 census.

Still having trouble locating some families? See "Try This Tool to Find a Missing Census" and adjust for 1950.

Day 3: Digitize and organize your family photos.

I was doing a nice job of enhancing, labeling, and storing my digitized family photos. (See "It's Time to Tame Your Family Photos.") Then it got away from me.

We should all have digitized versions of our physical photographs. Scanners are not expensive, but you can do a decent job with your cellphone, too. But please take the photo out of its frame or sleeve so there's no reflection or glare. And take the photo straight-on, not at a distorted angle.

Read the steps I take with digitized photos in "How to Improve Old Photos and Genealogy Documents." Once your digitized files are in shape, "It's Time to Organize All Your Family Photos." Pick a storage strategy for both physical and digitized photos. Make sure they're safe, and that you can find the ones you want easily.

Day 4: Add well-crafted source citations.

My family tree is a beast. I have 44,000 people, most of whom are Italians from the 1700s and 1800s. Because I'm adding up to 300 Italians a day, I'm skipping their source citations. "Sacrilege!" you say. Not really. I know I can easily find my source for any facts on these people. I'll add them if someone is interested in a branch.

But that should not be true for anyone from the 1900s or later. In my tree, those are the Americans with a good amount of documentation. In "Taming a Tangle of Source Citations," I detailed my process for making high-quality source citations.

The best way to tackle this goal is one document type at a time. For example, I can view the media gallery in Family Tree Maker and choose to see only the census forms. Then I can see which ones need improvement and do the work.
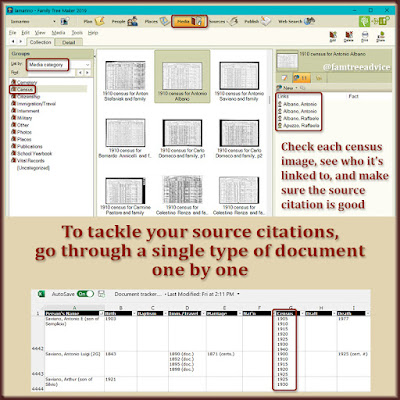
Find the documents and facts in your family tree that need a proper source citation.

Day 5: Search for missing vital records.

One of my favorite new resources is a treasure for my Bronx-based family. The New York City Municipal Archives finally made their vital records available online. And it's free. My family settled in the Bronx in 1898 and stayed there. There's so much for me to harvest from the Archives' website.

I began downloading these records by searching my tree for the notes I'd made. When I know the document number for someone's vital record, I add it to the details of that fact. (Ancestry.com indexes often include the document number.)

Finding the document number, place, and year can lead you to the vital records you need.

To be thorough, I could start with my 2nd great grandfather, Antonio Saviano. He's my first immigrant ancestor. If I go through his descendants one-by-one, I'll see exactly who needs a document from the Archives' site.

Or I could scan the birth column of my document tracker. The Archives' site says they have:

  • Bronx birth certificates ending in 1909
  • Bronx death certificates through 1948
  • Bronx marriage certificates ending in 1937.

The years vary for the different boroughs of NYC.

If I filter my document tracker to show people who fall into those years, I can find their certificates one at a time. For your family tree, there will be other resources to search. It's a matter of finding the people, and performing that search.

Day 6: Categorize your DNA matches.

DNA websites offer tools to help you label your DNA matches and add notes. On AncestryDNA, I created 6 categories I can add to any match:

  • Both sides, because some matches are related to both my parents
  • Father's side, for people connected only to Dad and me
  • Mother's side, for people connected only to Mom and me
  • Figured out, for matches I've identified
  • Needs work, for matches I should be able to figure out, but somehow cannot
  • Extremely low match, for people I wanted to preserve when Ancestry was cutting out matches below 9cMs or so.

Adding these categories and notes, helps me understand who I'm looking at. At any time, I can view particular categories. I like to regularly view only my unviewed matches to see who's new. I know exactly who one of them is, so I'll add him to Mother's side with a note. He's my 3C1R.

Day 7: Check your notes for unfollowed leads.

I'm sure everyone who works on their family tree keeps notes somewhere. A paper notebook, OneNote, a text file, or a pile of papers. Save day 7 to re-read your saved notes. Do some notes no longer apply? Throw them away. Can you complete other tasks because new document collections are available? Go do that!

What gem of a lead did you leave for yourself, and forget about? See "How Many Genealogy Gems Are You Sitting On?"

Now all that remains is to follow through and do this! Yes, I'm saying that to myself as much as to you.
28 September 2021

It's Time to Organize All Your Family Photos

I thought my family photos were well organized. My digital photos have file names that include the names of the people in the picture.

Then my uncle died, and I wanted to share a couple of photos of him as a teenager. One photo shows my Uncle Silvio as a teenager, laughing. The other shows Uncle Silvio and his future wife, my Aunt Lillian. In that photo, they seem to be part of a cheerleader squad for their school's football team.

It was awful to discover that I couldn't find either of these precious photos when I needed them!

First I looked in my "Family Tree\photos" folder for any file name that included my uncle's last name. Then I checked any family folders in my separate "Saved Pictures" folder. No luck!

I turned to my favorite search program ("Everything" for Windows) to scour my computer for Silvio's last name.

With this tool, I found the photo of Silvio laughing in a folder called "FamilyTree\etcetera\scans". That's a great way to lose your stuff. Put it in a folder called etcetera! The folder contains pages I scanned from my Aunt Lillian's photo album more than 10 years ago. She had the teenage photo of Silvio. But I still can't find the cheerleader photo. Is it possible I never scanned that one?

This wasn't the first time I had trouble finding a particular photo. It's time to come up with a better system.

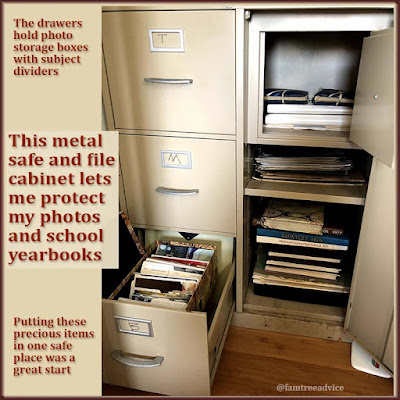
My family photos took a big step forward when I placed them all in a safe. But there's much more organizing to do.

Take Stock of Your Collection

In my "Family Tree\photos" folder, image files are generally named for their subject (last name first):

  • IamarinoPasquale.jpg
  • IamarinoPasquale2.jpg
  • IamarinoPasqualeWithGreatGrandchildren.jpg

I'd like to reserve my "Saved Pictures" folder for vacation photos. Each vacation has its own folder (like "California Feb 2016"), plus sub-folders for individual destinations during that vacation ("Santa Barbara", "Hollywood", etc.). But it also has my family's digitized slide collection stretching back to the 1950s.

My mother has given me tons of old family photos that I keep in a fireproof safe. I can't guarantee that I've scanned every single one of them. And I know I have a thick 1980s–1990s photo album somewhere in my house, but I can't find it.

Determine Your Goals

To organize any digital photo collection, start by asking yourself what you need from it. I would like to have only one or two places to look for any given photo.

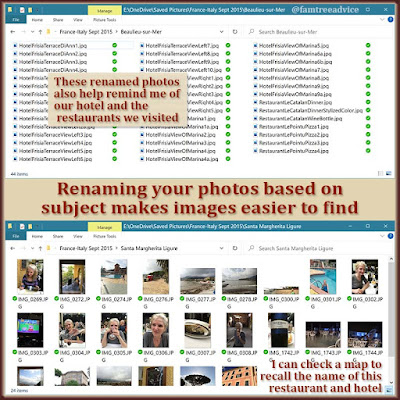
Rename your digital photo files with descriptive names. This will help you organize and locate them later on.

When I want to pull up a photo from Lyon, France, for example, I go to "Saved Pictures", open "France-Italy Sept 2015" and find the Lyon folder. I'll continue to keep all the destination photos in one place. But I'm going to review them and give them more descriptive file names. This will make specific photos easier to find.

Rather than sifting through 132 images of Paris, I can give them descriptive names, like:

  • Versailles-exterior-front.jpg
  • Versailles-Hall-of-Mirrors.jpg
  • Notre-Dame-Rose-Window.jpg

These descriptive names will make similar photos group together in the folder. Plus, I can use "Everything" to search for that famous rose-window.

Goal #1: Make all destination photo names more descriptive than IMG_1569.JPG.

In my case, it's the family photos that need more urgent attention. There's the folder I found called "scans" hiding on my computer. Its images don't follow my usual LastnameFirstname.jpg format. I'll begin by renaming them.

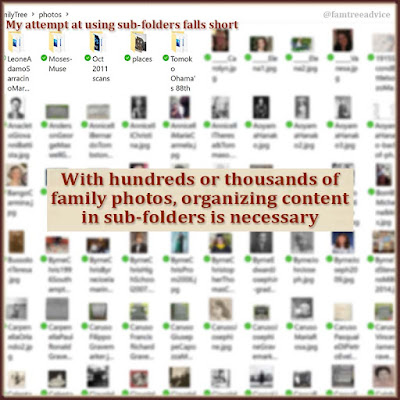
Like most genealogy fans, I'm going to wind up with TONS of family photos in one folder. They'll need some separation. Which organization method would you choose?

  • Put a date in the file name (whether it's general [1940s] or specific [1949])
  • Use sub-folders for each decade (1940s, 1950s, 1960s)
  • Use sub-folders for place (Ohio, Bronx, California)
  • Use sub-folders for family groups. I would need to include the name of the head of the family for this to work (IamarinoPasquale, IamarinoPietro, IamarinoFrank).
When you gather up and rename your family photo files, look for one or more of these ways to further organize them.

As you examine your collection, one or more of these filing methods may make the most sense to you. I know, for example, I have tons of photos from the Bronx. I could divide them by decade or exact location (mom's apartment house, dad's apartment house). But I know my California family photos are only from the couple of years my family lived there. They can all stay in one folder with descriptive file names.

Whichever method you choose, the purpose is to help you more easily find a particular photo.

Goal #2 has two parts:

  • Bring all digitized family photos into one location, improving their file names as you go.
  • Assess the entire collection for how best to divide them up.

Once your digitized photo collection is in good shape, it's time to take stock of your paper photos.

If you had to find a particular old photo of yourself and two of your best friends, could you find it? This happened to me last month. I needed a specific photo so my friends and I could recreate our funny pose 23 years later.

The photographs I've taken over the years are in a few cardboard boxes. They have dividers to separate them by time or place. I didn't see any photos from around 1998 in the boxes. I checked my "College" section, but the photo I wanted wasn't there. In the end, I found a forgotten 1990s photo album sitting in my safe. And there it was, along with a ton of photos of my sons as little kids. I need to digitize all these photos!

I also have two boxes of old photos from my mother, along with a stack of larger format photos. Are they all digitized? How should I organize them?

Goal #3: Go through your paper photo collection. Make sure you digitize and sort everything.

When you digitize your photos, remember to scan at the highest resolution available. This will allow you to zoom in and see details more clearly. If you have photo editing software, you can work to undo creases and spots on your photos.

This is a big project, for sure. In my case, it's long overdue. And I still need to find that cheerleader photo with my aunt and uncle!

As with any big family tree project, it's best to divide and conquer. Here's how I'll start:

  • Enhance the file names already in my "Family Tree\photos" folder. Those 700+ file names will group similar subjects together alphabetically.
  • Search for other photo folders on the computer. Then rename and bring everything into the main folder.
  • Check the digitized collection for natural breaks. Will organizing by time, place, or family group work best?
  • Check paper photos to see that you've got them all digitized.
  • Organize the paper collection to make future searches easier.

My family often turns to me to produce a certain photo. I want to make dead sure I am the family historian who can meet that need.

23 October 2020

4 Cornerstones of Genealogy Research

We all know the classic first rule of starting your family tree. "Start with yourself." Think back to your earliest genealogy research, and I'll bet you have a list of do's and don'ts.

I got interested in genealogy the year before my wedding. We were planning a honeymoon in Italy, and I had visions of finding distant cousins on my travels. (I didn't.) All I knew for sure was my grandfathers' hometowns, and that my maternal grandmother's family came from either Pastene or Avellino.

I filled a notebook with facts from ship manifests on the Ellis Island website. I pieced together families on squares of paper, laying them out on the floor. That looked stupid, I'm sure. So my husband bought me a 2002 version of Family Tree Maker software. It came with a basic subscription to Ancestry.com.

Now I had access to census sheets. They helped me piece together my grandmother's generation in New York City. I discovered Grandma's grandfather was my first immigrant ancestor. I finally learned his branch's town of origin from a ship manifest: Sant'Angelo a Cupolo. "Pastene," which I'd heard from my grandmother and great aunt, is a hamlet in the town of Sant'Angelo a Cupolo. Finally, I could find it on a map!

Learning the exact place of origin for Grandma's parents was so important. I realized it's a cornerstone to family tree building.

Cornerstone #1. Learn your ancestor's town of origin before going any further.

You see, I'd been going down the wrong path trying to find Grandma's Sarracino ancestors in Pastene. There's another town called Pastena (a one-letter difference) with a big Sarracino family. After adding the Pastena Sarracinos to my tree, I learned they were all the wrong family.

I struggled to find the hometown of my dad's maternal grandmother, too. A cousin-in-law who found me on a message board in 2006 knew my great grandmother. She often mentioned her town, calling it (phonetically) "pisqua-la-matzah."

Try finding that on a map! Here's how I figured it out. I searched Ancestry's immigration records for anyone named Caruso from a town that might be "pisqua-la-matzah." I found some from Pescolamazza. That's it! My great grandmother had to be from Pescolamazza. But it isn't on the map.

A quick search told me the town changed its name after World War II from Pescolamazza to Pesco Sannita. That is on the map, and it's a beautiful town. I've visited it twice.

The more research I did, the more record images I had piling up on my computer. That's when I realized the 2nd cornerstone of genealogy research.

Family tree research can get out of control in a hurry. Get organized now to lay a solid foundation.

Cornerstone #2. Follow logical and consistent document organization.

At first, I put every new document I found into one family tree folder on my computer. Rookie move. How would I know if a file with "1920" in its name was an ancestor's 1920 census or a 1920 ship manifest?

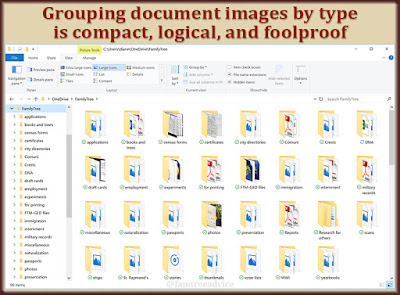
So I created sub-folders for each type of document I was collecting, including:

  • census forms
  • certificates (vital records)
  • draft cards
  • immigration
  • passports

Then I adopted a file-naming format that makes it easy to find everything I have for a person:

  • For census forms: LastnameFirstnameCensusYear. The name is the head of household.
  • For vital records: LastnameFirstnameEventYear. The Event is Birth, Marriage, or Death. Marriage documents get both the groom's and bride's names, like BiancoAntonioCarusoMariaMarriage1818.
  • For draft cards: LastnameFirstnameWW1 or WW2.
  • For ship manifests: LastnameFirstnameYear. I could have included Immigration before the year, but sometimes it's travel, not immigration. If multiple people are traveling, I use the name of the eldest or head of family.

This system works well for me. However, there were too many times when I downloaded a terrific new record, only to find out I had it already. I needed some sort of cheat sheet to keep from doing that again.

Cornerstone #3. Track what you have and what you need.

I created a document tracker spreadsheet. Each column is a different type of genealogy document. Each row is a different person. The last column lists the documents I still need to find for each person.

I think every nationality has the problem of too many people with the same name. I distinguish same-named people in my document tracker by including their father's name.

While I was cruising along, super organized, DNA came into the picture. We're all frustrated when a good DNA match has no family tree to view. But it's just as frustrating when their trees have no sources. They're completely unreliable.

I never want anyone to doubt my family tree. And that leads us to the final cornerstone of genealogy.

Cornerstone #4. Add sources or your family tree is worthless to others.

I support the facts in my family tree with detailed sources and links to the original documents. I'm on my way to having the best family tree on earth for my ancestral hometowns.

If you don't know your ancestor's hometown, ignore that family tree that seems so promising. If those people are from the wrong town, they're not your family.

I had these 4 cornerstones in mind when I started this blog in January 2017. If you go back to the beginning, you'll see I outlined them in the first few articles. Each one comes from experience. It would have been better if I knew them from day one. And that's why I spend so much time on this blog. I want to encourage other genealogists, no matter where they are in their journey.

How solid is your family tree foundation?

28 June 2019

It's Time to Tame Your Family Photos

Set your goals and dive into this photo scanning and filing project.

I may not always follow my own rules.
I have a confession to make. I may have bragged a bit recently about my super-tidy document image filing system. It is foolproof, and I do swear by it. (See "4 Important Steps for Each New Document".)

But there is one area where I've fallen flat on my face: Photographs of relatives. Not document images, but photos. I can never find the one I want when I want it.

Here's how I got myself into such a mess.

Bad Profile Photos

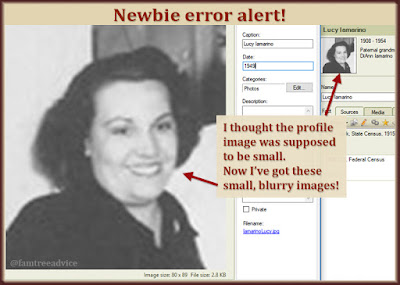
My husband gave me Family Tree Maker as a birthday gift in 2002. I thought a profile photo measuring 72 pixels wide by 80 pixels high was the best fit. That's very tiny! I should have been using any square photo and letting the software display it in that small box.

In the updated program, all these years later, those tiny photos aren't clear. They're stretched to fill the space. They look like low-resolution photos.

Every time I notice one of those undersized, blurry profile photos, it bothers me. I know I've got to do something about it.

You know how sometimes you know you're doing it wrong, but you just keep doing it?

Save it for Later

Ancestry.com has a feature called a Shoebox. I haven't used it much, but I like the idea. If you find something you think you need, but you're not ready to do the work, you can put it in the Shoebox. Hopefully you'll remember to go back to it another time.

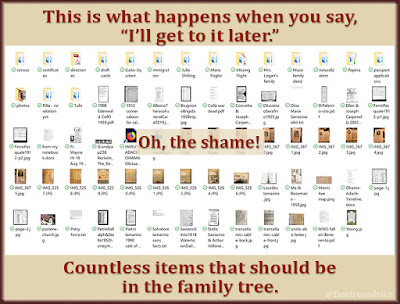
I decided to have a shoebox on my computer. I created a folder on my desktop called "gen docs". Whenever I come across a document I might need, or a family photo I might want to add to my tree, I put it in that folder.

Now my gen docs folder has 17 filled sub-folders and 52 loose items. It has census forms, city directory pages, ship manifests, naturalization papers, research I did for friends, and so much more.

It's safe to say my virtual shoebox is overflowing. I need to dig in and deal with these items.

That feeling when you plan to get to it soon, but years have come and gone.

Not in the Family Tree

When I'm not shoving photos into my gen docs folder, I usually stick to my plan of:
  • naming the file for the main 1 or 2 people in it, LastnameFirstnameEventYear.jpg
  • adding a title and description to the image file's properties
  • storing it in my FamilyTree/photos folder.
But some of the images in the photos folder are not named properly. I've got mom&grandma.jpg, MomDadWedding.jpg, DadAuntLil.jpg, and so on.

Each of these photos needs to go through the process above so I can add it to my family tree.

I've got my digitized family photos in too many locations. I've lost track of them all. There's a folder called "Oct 2011 scans". That dates back to when I moved near my parents and scanned my mom's photo albums. Did I forget to do anything with them?

It's quite the mess.

So what am I going to do about it?
  • Replace those tiny profile images. Re-scan the best photo I have of the person, crop it into a square head shot, and make that their profile image.
  • Check the file names of photos in my FamilyTree/photos folder. Make sure they follow my file-naming system so I can find any photo when I need it.
  • Add images to my tree. I never meant for my gen docs folder to get so full. I have to attach these photos to my family tree.
  • Better organize my non-family tree photos. I've done a good job organizing my vacation photos. They're in folders named for the vacation (Finger Lakes Aug 2016, France-Italy Sept 2015, etc.). Most have sub-folders for the different towns we visited on that vacation. But I've got to do something about the more vague folder titles, like "old photo album" and "so miscellaneous".
  • See if I still need to scan anything in my old family photo collection. I'll evaluate them, name them properly, and put them where they belong.
This is a project I've been saving for the right weekend. Now that I've got a firm plan, this is going to happen.

Are you neglecting your family photo collection?

18 June 2019

3 Simple Rules for Managing Your Digital Genealogy Documents

My on-the-job organization skills help a lot with my genealogy research.

How did you begin this all-consuming hobby called genealogy? You may have started your simple family tree for a school project, or your kid's school project.

At some point, we each decided to get more serious about genealogy. We started looking for documents on genealogy websites. We tried to find our parents or grandparents on a census sheet, and we downloaded the images to attach to our family tree. Then we branched out. We found our grandparents' brothers and sisters living with their spouses and kids. Then we looked for ship manifests with the names of our immigrant ancestors.

It becomes addictive before you know it. Time passes, and we have a decent collection of facts and images.

Follow 3 simple rules and you'll always know where to find any digital genealogy file.

But what do we do with all those census and ship manifest images?

I started downloading census images in 2002 when I got my Ancestry.com subscription. Seventeen years later, I have 732 census sheet images in one folder. I have 414 ship manifest images in another folder.

You may have a lot more than that. My census collection is small compared to the size of my family tree. That's because I don't have a single blood relative who was in a census-taking country before 1900.

It wasn't long before I realized I had a problem. I had to figure out how to organize the census sheets, ship manifests, and everything else I was finding. I wanted the alphabetical organization of files in folders to make it easy to find any one image.

I had to name and organize the files in a way that would always make sense to me.

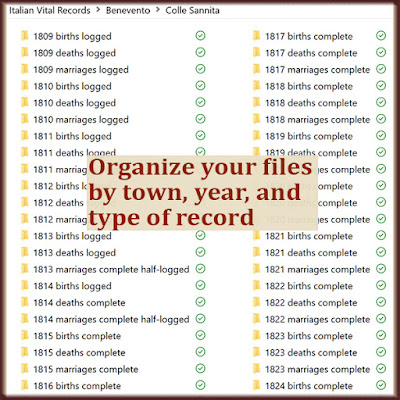
GeneaLOGICAL™ Organization

These are my 3 basic rules for taming my collection of genealogy document images.
  1. Have one main FamilyTree folder. Mine backs up to a cloud automatically.
There are a limited number of genealogy document types. Filing by type makes great sense.
  1. Have a sub-folder for each type of document:
    • census forms
    • certificates (birth, marriage, and death documents)
    • city directories
    • draft cards (registration cards for World War I and II)
    • immigration (ship manifests)
    • military records (different than draft registration cards, these detail a person's military service)
    • naturalization (declaration of intent, petition for citizenship, and actual citizenship)
    • passports (applications)
    • photos (including grave marker photos)
There's no doubt what's where and which file is which. All it takes is a simple naming pattern.
  1. Name each file for the main person, last name first, and include the year. For example, in my immigration folder I have:
    • IamarinoPasquale1902.jpg. That's my great grandfather who came to America once and stayed.
    • IamarinoPietro1920-p1.jpg and IamarinoPietro1920-p2.jpg. That's my grandfather who came to America at a time when ship manifests covered two pages.
    • IamarinoPietro1958.jpg. That's Grandpa when he was a widower and went to visit his mother in Italy for the first and only time.
    In my census folder I have images named for the head of household:
    • IamarinoPasquale1910.jpg
    • IamarinoPasquale1915.jpg
    • IamarinoPasquale1920.jpg
    That's clear, right? Now here's an exception because my grandfather had a cousin with his same name:
    • IamarinoPeterLucy1930.jpg. That's Grandpa and Grandma Lucy.
    • IamarinoPeterMarie1930.jpg. That's Grandpa's cousin and his wife Marie.
    For Birth, Marriage, and Death records, it's Lastname Firstname Event Year. For example:
    • ZeollaPasqualeBirth1821.jpg. The 1821 birth record of Pasquale Zeolla.
    • MarinoFrancescoDeath1844.jpg. The 1844 death record of Francesco Marino.
    • IamarinoAngeloAntonioPozzutoAnnaelenaMarriage1817. Marriage records get the groom's name and the bride's name for clarity. Thank goodness for long file names. This is the 1817 marriage record of Angelo Antonio Iamarino and Annaelena Pozzuto
I've seen countless debates about family tree file storage. They all look too complicated to me, and not helpful at all. Some people suggest keeping the document images in folders separated by family.

If I had a separate folder for each family or each last name, I'd have an insane amount of folders. And where would I put my great grandmother before she married my great grandfather? In the Caruso folder or the Iamarino folder?

My file names would have to be much longer, too. How would I know the CarusoGiuseppe1900.jpg was a ship manifest and not a census form?

Say I need to look at my great grandmother's brother Giuseppe's 1905 New York State Census record. I know exactly where to find it. It's in the census forms folder, and it's named CarusoGiuseppe1905.jpg.

After 17 years, I haven't had a split-second of regret about my file-naming and filing system. A place for everything, and everything in its place.

Is your filing method driving you crazy? Are you wasting time trying to find the right image? Are you ready for a genealogy file do-over?

A word of warning. I use Family Tree Maker, and I let it copy all images into a single media folder. That way, anything I do to my images' names or locations has no effect on my family tree.

Your setup may be different. Don't dive into a big file naming project before testing what it will do to your genealogy program. Let's get organized!

22 January 2019

Plowing Through My 2019 Genealogy Goals

It isn't to late to set some goals for the year. Set reachable goals and reap the benefits.

Goals give you a purpose and direction. It can be fun to let your genealogy research lead you wherever it wants. But goals lead to more productive research.

I set 7 genealogy goals for 2019. The first 3 are finite goals. They aren't "I hope I can discover…". They are "do this task until it's finished".

Here's where I stand with my first three 2019 Genealogy Goals:

1. Log the first five years' worth of birth records from each town into spreadsheet

This one is done! I want to create a digital, searchable database of every key fact from 1000s of documents. I downloaded birth, marriage, and death records from my 6 ancestral Italian towns. They start in 1809, and some go into the 1940s.

Because it's an insanely big project, I broke off a chunk—5 years of birth records—to encourage myself to get into it. I'd already transcribed a good amount of the 1809–1813 births, so this wasn't an accurate test of how long the whole project will take.

But the benefits are real. After I finish the next 2 goals, I want to work on the 1814–1818 birth records. That eagerness to continue is exactly what I was shooting for.

2. Search for all missing census forms in my document tracker

Dive in and start those goals. Look what I found in 3 sessions.
Dive in and start those goals.
Look what I found in 3 sessions.

I'm going through the alphabetical list of people in my document tracker spreadsheet. I'm focusing on which names have a missing census form in their "Need to find" column.

Right now I'm into last names beginning with C, and it's been a very satisfying three days. I've added a lot of missing documents to my family tree.

Sometimes while searching for a census form, I can't help but see the death record or marriage index that I was missing. So I'll grab those while I'm at it, too.

The important thing to remember is to stick to your process and handle each document carefully. My routine when finding a new document image is to:
  • Crop it in Photoshop if needed.
  • Rename it using the style I've developed. My file naming rules make it easier to find any document.
  • Add it to the family tree record of each person named on the document. That means each family member on the census form gets a copy of the census sheet in Family Tree Maker.
  • Add each fact and the source citation to each person. Each family member will get a Residence fact based on the census image. Those with a job will get an Occupation fact, too. And all facts get the proper source citation. Other facts can include immigration year, naturalization year, birth and marriage years.
  • Update my document tracker spreadsheet. This is my inventory and to-do list rolled into one. It's important that I keep it accurate.
One thing I decided after starting this goal was to be reasonable. If several search techniques don't get me the census I need, I will move on. The important thing is to make a good effort.

You can add notes and a title to every document image you collect.

3. Enter every Pozzuto baby from Colle Sannita into my family tree

I started this goal last year. A DNA analysis method pointed me to a specific last name from my grandfather's hometown. Someone with this name is highly likely to be a direct ancestor for both my parents. Their DNA says they are 4th to 6th cousins. My true goal is to find my parents' connection by analyzing these babies.

I'm working my way through my downloaded collection of vital records from Grandpa's town, adding each of these babies to my tree. I add their parents and try to ID their grandparents. If they aren't connected to anyone in my family tree yet, I give them a profile picture that says "no relationship established". If I find their connection later, I'll be sure to remove their relationship graphic.

It's still January, and I'm having an insanely productive genealogy year already. I plan to bounce between goals 2 and 3 to avoid boredom. That'll make me feel like I'm accomplishing more, too.

It's still January, and it's only January. Have you set your 2019 Genealogy Goals?

19 October 2018

3 Ways to Find Your Ancestors in a Huge Pile of Documents

You've downloaded thousands of vital records from your ancestor's birthplace. How do you find your people in all those files?

My genealogy research changed dramatically in 2017. I decided to put my U.S.-based research on hold. Why? Because a new door opened wide. Now I have access to my ancestors' birth, marriage and death records in the old country.

Finally! I'm able to take my great grandparents back many, many generations. So far, I've discovered the names of:
  • 4 of my 8th great grandparents
  • 7 of my 7th great grandparents
  • 34 of my 6th great grandparents
  • about half of my 128 5th great grandparents
And I will discover many more.

A brief explanation: FamilySearch.org ended their microfilm program. They used to send rolls of microfilm to your local Family History Center. You could visit these rolls during your center's limited hours and view them on antiquated machines.

But in 2017 they began digitizing everything.

Earlier, I spent 5 years viewing microfilmed vital records from my grandfather's hometown. I typed all the important facts into a laptop. Suddenly those thousands of records are available as high-resolution images online. Free! And so are records from the towns of all my ancestors. You can find them on FamilySearch and on an Italian website called Antenati (ancestors).

I started viewing images from my grandfather Iamarino's town and downloading them. One by one. It was going to take forever!

Then I learned about a simple program called GetLinks. This program runs on any type of computer. It's compatible with FamilySearch and Antenati. For a full explanation and a link to the program, see How to Use the Online Italian Genealogy Archives.

Now I have well-organized image files from all my ancestors' hometowns. They range in time from 1809 to as late as 1942. But they include rewritten documents of births and deaths from the 1700s. That's how I've found such early ancestors.

Simplify your search by organizing your downloads.

I'm limited to documents written as early as 1809 only because it's Italy. If your ancestors are from other countries, you may find much older records on FamilySearch.org.

So let's say you've downloaded thousands of images containing oh-so-many of your ancestors.
  • How do you find your people?
  • How can you efficiently pull out the people and facts you need? 
  • What's the best way to find your needles in those haystacks?
I'm approaching my 8 haystacks (individual Italian towns) in 3 different ways. You might choose one or two, or want to do them all.

1. Most time-consuming; best long-range pay-off

I'm typing the facts from each document into a spreadsheet. In the end, I'll have an easily searchable file. Want to locate every child born to a particular couple? No problem. Want to find out when a particular 4th great grandparent died? No problem.

But it is slow-going. I've completed about 6 years' worth of birth, marriage and death records for one town. I return to this project when I'm feeling burned out on a particular ancestor search and want a more robotic task to do.

There is another benefit to this method. Spending this much time with the documents has made me very familiar with the names in my ancestors' towns. I can recognize names despite the awful handwriting. And when a name is completely unfamiliar, I often discover that the person came from another town.

A well-organized spreadsheet is best for making records searchable.

2. Takes a few extra seconds; pays you back again and again

Whenever I find a particular record, I like to edit the name of the image file to include the name on the document. If it's an image of a single birth record, I add the baby's name to the end of the file name. If the name is common, I also add the baby's father's name. (I use the Italian word "di" as a shorthand for "son of" or "daughter of".) If it's an image of 2 birth records or a marriage record, I'll add both names to the file name.

The benefit of renaming the files comes later. When you're making another search in the future, the renamed file can save you time. You can either spot the name you're looking for, or use the search box in that file folder. You can even use the search box at a higher folder level.

Imagine you're looking for my grandfather's name, Pietro Iamarino. You can search his entire town at once and let your computer find every file you've renamed to include "Pietro Iamarino".

When I began downloading the files, I renamed each file containing anyone named Iamarino. Now I can always find the Iamarino I want. Quickly.

Adding people's names to the file names makes the collection searchable.

3. Efficient, fast and fruitful; makes you want to come back

To my mind, this is the most important lesson. You'll be more efficient at finding what you need in this massive amount of files if you put blinders on.

Search with a tight focus. Ignore the people in the index with your last name. You'll get back to them. But at this moment, when you're searching for someone in particular, don't look at anyone else. Zero in on that one name and complete your search.

Use this focused approach and find your ancestors faster. The moment you find them, rename the file and get that person into your tree.

My many folders of vital records hold countless discoveries for me. But I've found that choosing one family unit and searching only for them is highly effective. Here's an example.

I've found the birth record of a particular 2nd great grandparent. I know their parents' names (my 3rd great grandparents), but I don't know when they married or their exact ages. I'll search the surrounding years for more babies born to this couple. Now I'm putting together their family. I'm also trying to identify which is the eldest child. Now I can search a year before the eldest child's birth for the couples' marriage. There I can find their ages, and possibly see a rewritten copy of their birth records.

With that set of marriage records and my 3rd great grandparents' birth records, I've now discovered the names of 2 sets of my 4th great grandparents. And if they weren't born too early, I may be able to find their birth records, too!

Having built out one family unit as far as I can, I'm even more eager to pick a new family to investigate. Sometimes I'll choose a family with a dead end, and work to find that missing piece of the puzzle.

Which method will work best for you? Or will you combine all 3 as I'm doing?

21 August 2018

How to Back Up Your Family Tree Files Automatically

This one decision is my biggest genealogy time-saver.

Last December I wrote my list of genealogy goals for 2018. I'm making progress, but at least 2 of my goals will spill over to next year's list.

That's why I'm so happy, week after week, about my decision to back up my family tree files automatically. Well, automatically and also manually, because two backups are better than one.

There are free storage options and paid storage options. I'll list several of them below, but first: Automation.

I've decided to use my Microsoft OneDrive cloud storage for my genealogy files. All my files are still stored locally on my computer. But they're mirrored and continuously backed up to OneDrive.

My genealogy files are backed up instantly, automatically.

Continuously backed up means:
  • My document tracker spreadsheet is always saved on my computer and the cloud.
  • Each census sheet or birth record I download to add to my tree is backed up to the cloud at the same time.
  • When I work in Family Tree Maker and make a backup file, the tree and the backup are also saved on my computer and the cloud.
I don't have to take an extra step to back them up. But, I also have an external, 1 Terabyte drive. Once a week I look at all my genealogy folders on my computer, sorting them by date. I copy anything with a newer date than my last backup to the external drive.

My OneDrive files, accessible to me online, anywhere.

It's fast, efficient and safe. Plus, having your files online, in your password-protected storage area, means you can access your files from anywhere.

I like syncing a portion of my computer with OneDrive because the files are still on my computer. They'd still be there even if I had no internet access.

Here are several options for online storage that you can use:

Google Drive is another automatic backup option.
Google Drive is another
automatic backup option.

OneDrive

I'm a monthly subscriber to Microsoft Office 365. I need it for work, and the cost is low enough that I'll keep subscribing even after I've retired. My subscription includes 1 Terabyte of storage space. Even with all my genealogy files on OneDrive, I'm only using a tiny portion of my Terabyte—about 182 GB. You can get 5 GB of free storage space or 50 GB for $1.99/month. Visit OneDrive to learn more.

Google Drive

You can also use your free Google account for automatic backup. Google Drive lets you synchronize folders with your online storage space automatically. It works with your Windows or Mac computer, and your Android or iOS device. Google Drive gives you 15 GB of storage for free. For $1.99/month, you can buy 100 GB of storage. Visit Google Drive to learn more.

iCloud

Do you have an iPhone or iPad? If so, you have 5 GB of iCloud storage. You can access it from your computer as well as your devices. That's not a lot of space, but you can pay for more storage. The cost depends on your country and how much space you want. Visit iCloud to learn more.

Dropbox

Free storage with Dropbox is limited to 2 GB. You can buy 1 Terabyte of online storage space for $9.99/month. I like to use Dropbox for file sharing. I've posted fill-in-the-blanks census sheets there and other PDFs to share with specific people. Visit Dropbox to learn more.

Your Internet Provider

If you have an internet connection in your home, your service provider may offer you some free storage space. Check with your provider.

You can see that the paid plans are very competitive with each other. With OneDrive, I'm basically paying for that 1 Terabyte and getting Word, Excel, PowerPoint and more for free.

No excuses now. Even if you split your files among different free storage spaces, it's time for you to create your back up plan.