19 September 2017

Free Resource Lets You Plot Family Tree Locations

A few months ago I explained how you can add locations to Google Maps and save them in your own personal collection.

I use these collections to plot my relatives' homes in Italy, the landmarks I can see from my mountaintop home, and the many places I've lived.

You can use Google My Maps for genealogy.
You can use Google My Maps 
for genealogy.
Google's mapping features can come in handy to family tree researchers like us.

If you don't have a Google account, create one. It's free and gives you access to far too many tools to ignore. Once logged in, go to Google My Maps and click the red button to Create a New Map.

You can start adding addresses and adding a description to each map pin. You can color-code your map pins, maybe choosing different pin colors for different branches of your family tree.

Create different layers and you can separate the locations by family unit.

Google offers plenty of help explaining how to:
  • Create, open, or delete a map
  • Add places to your map
  • Save directions on My Maps
  • Draw lines and shapes in My Maps
  • Import map features from a file

That last feature could be a tremendous help for your family tree research. You can use your family tree software to create a report on all the addresses in your tree. Then copy those addresses into a spreadsheet. Finally, import the locations into your map.

My original thought was to create a migration map for some of my ancestors. Google My Maps can do that. I've added my grandfather's addresses to a map. I've detailed each map pin with his name and the year(s) he lived there.

This fully customizable, full-featured map highlights my grandfather's travels within the United States.

Now I can use Google My Maps to draw lines showing his progression through time. In this image, instead of drawing a straight line, I used driving instructions. This makes a more realistic picture of Grandpa's path from his uncle's home in Newton, Massachusetts, to the coal mine in New Castle, Pennsylvania.

I've only scratched the surface here. Imagine creating a detailed map to include in your family tree research.

UPDATE: I did a test of importing an Excel file of addresses into a map. You can import only 200 addresses at a time. Add a header row called Address. It worked well. See the "Import test" layer. Now I can customize these new map pins as desired.

17 September 2017

How to Increase the Value of Your Family Tree Images

As a long-time computer professional, I'm embarrassed that I didn't learn this till today.

You can add custom details and descriptions to any JPG file on your computer. Your customizations will stay with the file when you copy, move or share it.

The biggest benefit to customizing your image files' details may be this:

You can search for your customized description in a huge folder of images and quickly find the file you need.

You can rename your images as needed.
I have thousands of downloaded vital records from the Italian Antenati website. As I go through them, I like to rename some of the files to include the name of the subject. If it's a close ancestor, I might include "my 4GA" (my fourth Great Aunt) in the file name. But now I can get more specific—especially with those direct ancestors.

This works on Windows or Macintosh. In Windows 10, right-click the image and choose Properties. Then click the Details tab. Many of the fields are editable. I never thought to check that before!

The Description and Origin sections are editable.
For Windows 7 instructions, see this short tutorial. For Mac users, see these instructions.

Before diving into this project, I'm going to decide on a set of standards. What might I want to search for? Which details are most important? My first thoughts are:
  • Person's name, year, and type of record (for example, Libera Pilla 1882 birth record)
  • The person's relationship to me (for example, my great grandmother, or my paternal grandfather's mother)
  • Which town the record comes from and the type of record (for example, Colle Sannita; birth record)
  • The URL of the original image and the name of the source
I'd recommend giving lots of thought to your own set of standards. Then start with the images that are most important to you. I'll start with wedding photos and my closest relatives' vital records.

Searching is easy with customized descriptions.
Ironically, this tip is the solution to the problem I was having when I stumbled upon it. I wanted to find my great grandmother's birth record to send to my cousin. I couldn't remember her year of birth, and I didn't want to wait for Family Tree Maker to open. So I tried looking in several folders without success. I finally opened my tree on Ancestry.com and found the correct year. Then I happened to click on the image's properties and discover I could edit them!

Now a quick search for my great grandmother's name and "birth record" brings up the right image.

How will image details make your family tree research a bit easier?

Bonus: Select multiple images and edit their details at once.

15 September 2017

How to Create Your Ancestral Hometown Database

What genealogy fan wouldn't be thrilled to find their ancestor's hometown records online?

That moment came for me when I learned about the Italian website, Antenati. Antenati has birth, marriage and death records for my handful of ancestral towns in Italy. Other genealogists are finding their ancestor's records on FamilySearch.org.

A free computer program called GetLinks (no longer works with Antenati) makes it easy to download these digitized records from both FamilySearch.org and the Antenati site. It's written in Portuguese, but don't let that worry you. I've written several times about using these records and the program. See:
If you've downloaded documents from your ancestral hometown, you may have hundreds or thousands of images on your computer.

Now what?

Once you download all the records from your town, imagine how many of your relatives are in these folders!

If you're looking only at each year's index and finding what you know you need, you're missing the boat. And that boat is overloaded with your ancestors!

My recommendation: Make a spreadsheet database of every important fact in each document.

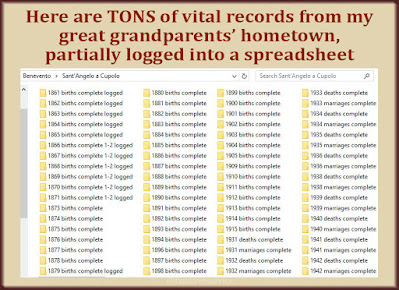
My database-in-progress for several towns' birth, marriage and death records.

What's the point? With a spreadsheet of facts, you can sort an entire town's birth records by last name. If you sort by last name and father's name, you will see all the children born to your ancestor.

There will no doubt be ancestors in your spreadsheet that you never knew existed.

Here are 5 steps to creating your ancestral hometown database from your downloaded files:
  1. Examine the records for the fields you want to capture. For example, birth records may contain the baby's name and birth date; father's name, age and occupation; mother's name and age; the address where the baby was born or where the father lived (not always the same); and the baby's baptism date. Death records will contain different facts, and so will marriage records.
  2. Create columns in your spreadsheet to hold all the facts. I keep birth, death and marriage records on different sheets in my Excel file so they can have different column headings.

    TIP: The best way to be able to sort your records by date is to keep the year, month and day in separate columns.
  3. Enter information from the documents into your spreadsheet. This takes time, but I found shortcuts as I did this last night.
    • I went through one year's birth records, entering only the baby's name into the spreadsheet. I put the baby's last name in one column and first name in another. (I record parents' names as last-name-first to help with sorting.)
    • On my second pass through the records, I entered the birth and baptism dates.
    • On my third pass, I entered the mother and father's information.
    Why is this better? I was always looking in one specific spot on the page for the information I wanted. It felt faster than going one document at a time, picking out facts from all over the page.
  4. Sort the data by any column to uncover hidden facts. You may find an unknown sibling. You may find that a man had several wives over the years. You may find several siblings for your ancestor who died young.

    See Dr. Daniel Soper's YouTube channel for tips on using Excel. Many tips will apply to other spreadsheet software.
  5. Share your database! Years ago I documented the facts from the vital records for my grandfather's hometown. I gathered these facts while sitting at a microfilm viewer in a Family History Center (for years!), so I used a simple text file. You can't sort a text file, but at least you can search it. I shared this file, as well as a GEDCOM for the whole town, with other descendants of that town.

    Your spreadsheet can be a valuable resource to other family tree researchers. Once you're done, I encourage you to share it everywhere you can think of.
I documented two years of records while watching the Yankees slaughter the Orioles last night. I expect to get much further tonight because of the shortcuts I found.

When you have your database, find an appropriate Facebook group or other place, and put the data out there. Genealogy is a collaborative sport!