Results of Following Genealogy Best Practices, Part 2
Last time I wrote about the priceless benefits of documenting an entire town. Today I'm focusing on another pillar of my genealogy philosophy. It can help you produce a valuable family tree.
Stick to Your Organization Style
I'm a terrific on-the-job learner. I've become a whiz at organization and efficiency. I like to apply best practices from my work life to my genealogy life.
Here are my top organization and documentation techniques. They've become second nature, and they make my tree stronger every day.
Do what's logical for you and what you think will be logical to your genealogy research heir.
The short version of what's to follow is this:
- Categorize: create high-level folders to hold your documents
- Recognize: name your files so they say what they are
- Annotate: add metadata to the image files themselves
- Find: add source citations to your facts right away
- Track: Keep an inventory of every document you've found
Categorize: Consistent Folder Structure
Early in my genealogy days, I began downloading and saving document images on my computer. I created a main FamilyTree folder with sub-folders for the major types of documents:
- census forms
- certificates (birth, marriage and death)
- draft cards
- immigration
I added more folders as necessary: naturalization, applications, passports. The combination of my simple file folder structure and file naming discipline makes it easy to click my way to a particular document. I don't have to search my computer or wonder if I'm overlooking the file.
Recognize: Logical File Naming
- last name
- first name
- type of document (only necessary in my "certificates" folder)
- year
- if needed, the file name includes -p1, -p2, -v1, -v2 to distinguish between files that should have the same name
Here's an example from my census forms folder:
- AusterJacob1920.jpg
- AusterJacob1925.jpg
- AusterJacob1930.jpg
- AusterJacob1940.jpg
I make a habit of naming census files for the head of household. In Jacob Auster's case, these file names are crucial because Jacob used a different first name each time!
These examples from my certificates folder show me all I have for someone at a glance:
- PisciottiLuigiBirth1825.jpg
- PisciottiLuigiPecoraAngelamaria1stMarriageBanns1848.jpg
- PisciottiLuigiPecoraAngelamaria2ndMarriageBanns1848.jpg
- PisciottiLuigiPecoraAngelamariaMarriageLicense1848.jpg
- PisciottiLuigiPecoraAngelamariaMarriage1848.jpg
It looks like I need a death record for Luigi Pisciotti.
Annotate: Useful Image Annotation
As soon as I download an image, I crop it in Photoshop, name it according to my style and save it in the proper folder. Then I right-click the file, choose Properties and click the Details tab. I fill in the empty Title and Comments fields. Whatever I put there stays with the image file.
For the Title, I enter exactly what I want to see in Family Tree Maker, like "1825 birth record for Luigi Pisciotti". In the Comments field I include the URL where anyone can find the original file. If it applies, I'll include the line number(s) of interest.
When I add the image to Family Tree maker, it imports those two fields.
Anyone finding a common ancestor in my tree on Ancestry.com also sees those important image details. To learn more, see How to Increase the Value of Your Family Tree Images.
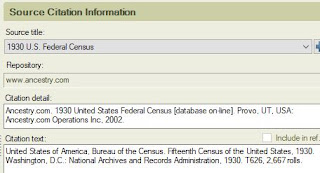
Find: Thorough Source Citation
I like my source citations to be simple. For all the census years, I name the citation as simply as "1930 U.S. Census". Most other sources I name exactly as they appear on Ancestry.com. For example, "New York, Index to Petitions for Naturalization files in New York City, 1792-1989".
But in the Citation detail field I add the description of the document collection, taken right from the source. Example: "Ancestry.com. New York, Index to Petitions for Naturalization filed in New York City, 1792-1989 [database on-line]. Provo, UT, USA: Ancestry.com Operations, Inc., 2007."
In the Citation text field, I copy more information from the source. Example: "Soundex Index to Petitions for Naturalization filed in Federal, State, and Local Courts located in New York City, 1792-1989. New York, NY, USA: The National Archives at New York City."
The important thing is to add a source to each fact as you enter it. Adding a birth date? Attach the source. Adding an address? Add the source. Immediately. To learn more, see Trade Up to Better Family History Sources.
Track: Sanity-saving Document Inventory
While this last item is important to me, some of you may think it's nothing but extra work. I keep a single spreadsheet of each document I've attached to someone in my family tree.
If I'd opened that spreadsheet this morning, I wouldn't have bothered downloading a 1907 marriage record for a cousin—because I already had it! You can't keep all these facts in your head. A document tracker keeps you from wasting your time. Plus it shows you what you're missing. To learn more, see Track Your Genealogy Finds and Your Searches.
Next time you download a document image for your family tree, think CRAFT. If you've already got your category folders created, think RAFT (picture actor George Raft flipping a coin). Recognize means name your files in a way that helps you recognize what they are in the future. Annotate means add details to the properties of each image so it makes sense even out of context. Find means add a source citation to each fact so you can find where it came from. Track means update your inventory so you'll always know what you've found.


No comments:
Post a Comment
You may leave an anonymous post if you have no Google account. The author screens each comment for spam before it appears here. So don't bother to spam.