Are you putting bad-quality images in your family tree? You don't have to live with crummy images. Here are some tips for making your images better than the way you found them.
Now, I've used Adobe Photoshop since 1991 when it was called Aldus PhotoStyler. It came free with the first digital scanner I bought, which was crazy-expensive. I've updated it several times over the years, and now I have it on a monthly subscription, so it's always up to date. If you don't have a favorite photo-editing program, find links to some free ones at the bottom of this article.
A heads-up for Ancestry users: It's nearly impossible to crop an Ancestry.com image without blowing up its file size. I tried a census sheet as a test, and my cropped image was 4 megabytes compared to the original 1 megabyte. When I took steps to reduce the file size, of course the quality suffered.
Bottom line: I don't go through the following steps with documents saved from Ancestry.
Restore Faded Photos
My grandparents' 1922 wedding portrait was crumbling and faded. I took it to a local photographer. He photographed it, restored the damaged areas in Photoshop, and made me a full-size print to frame. I wrapped up the original for safe-keeping.
The photographer said the sepia/brownish tint of the original is what happens when black and white photography fades. I'm sure most of us have old faded photographs of family members. But you don't have to put the deteriorated version in your family tree.
 |
| Your photo-editing software can greatly improve old family photos in a few clicks. |
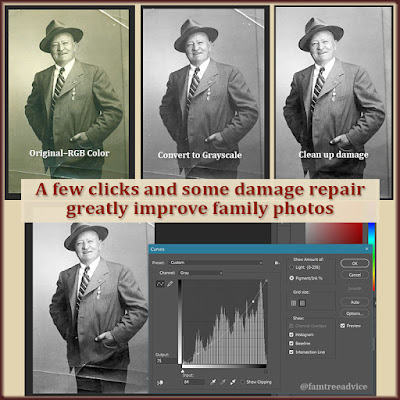
Let's restore a photo of my great grandfather's nephew, Giuseppe. I got this photo from Giuseppe's family. It's faded and has bad creases in it.
To fix a faded, discolored black and white photo in Photoshop, click Image / Mode. You'll probably see that the image is RGB Color. Change it to Grayscale. Gone is the yellow, brown, or greenish cast. Now click the Image menu again and choose Auto Contrast. You should see the black portions get blacker, and the photo get less faded.
I took a Photoshop tutorial recently and learned how to use the Curves tool. You'll find it on the Image / Adjustments menu. By changing the curves on this screen, you can bring out more detail in areas that seem too dark or too light.
Crop Out the Excess
Now the photo of Giuseppe is looking sharper. If there were an old-fashioned border around the photo, I could crop that out. In this case, I can crop the left side to center Giuseppe in the photo.
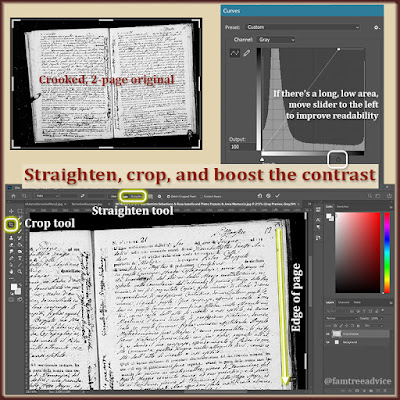
I do most of my cropping on the old Italian vital records I work with every day. Many of the birth, marriage, and death records are photographed as two facing pages in a book. I don't want my ancestor's birth record image to include someone else's birth record. So I crop out the excess. I also use Photoshop's Straighten tool (my favorite tool!) to fix a crooked page. I find the edge of the page and click near the top. I let go of the mouse near the bottom, and the whole image tilts to straighten out.
 |
| You don't have to live with the original quality of document images. |
After I straighten the image, I crop out the facing page and any black borders. Then I enhance the contrast to see the writing better on a faded document. Now the image is suitable for my family tree.
Repair Damage
With Giuseppe's photo looking all crisp, and Giuseppe centered in the photo, it's time to repair those creases. Photoshop has a healing tool that works like magic. If you click on a damaged area, it makes the area better match its surroundings. The tool erases little spots, too. Just go slowly. Keep the size of the tool small, and work on small areas at a time.
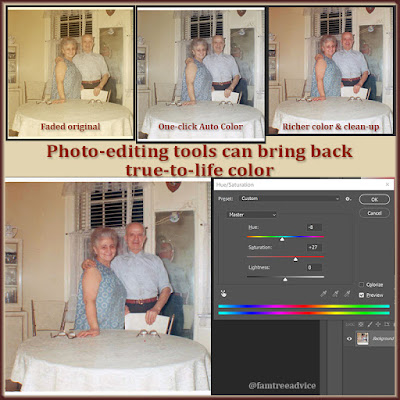
These repairs aren't for black and white images only. I have a faded color photo of my grandparents. It has an unnecessary white border, too. To start, I can choose Image / Auto Color to bring back some of the faded color. It works well, in this case. Their skin tone looks good, and their kitchen looks the way I remember it. But I can boost it a bit by choosing Image / Adjustments / Hue/Saturation. I can adjust the separate Hue and Saturation sliders until I feel the color is as realistic as possible.
 |
| You'll be amazed by the rich color software can restore to faded old photos. |
Now I've got a much more lifelike photo of my grandparents in their kitchen. I cropped out the white border and repaired a few spots and scratches.
Add Details to the Properties
Once your image is looking great, don't forget to add details to the file's properties. On a Windows computer you can right-click the image file and choose Properties. Then go to the Details tab to add a Title and Comments. I don't know how this looks on a Mac, but I'm sure it's there.
Free Photo Editing Tools
Here are a bunch of free photo editing programs for Windows and Mac. Scroll past the ads at the top and bottom of the list, and notice that there are a few pages' worth of program listings.
Two of the most popular apps are GIMP (for Windows and Mac) and Irfan View (for Windows only). My son uses GIMP, and I've seen him to do remarkable, artistic things.
You don't have to rely on the kindness of strangers to fix your old photos. Try these techniques on a duplicate of the original. Put your best work into your family tree.
Good Post! Important thing to think about. Make sure you keep an unmodified backup of the file for a couple of reasons. (1) Perish the thought but you might mess up the file. (2) Sometimes you might prefer the unmodified original. It is closer to the original in some ways.
ReplyDeleteAlso, I have used GIMP with good results. (for me on a Mac)
Thanks for these instructions. You have to try different things, so keeping the old file at least until you're happy with your work means you can save different attempts at correction and choose the best one.
ReplyDeleteI've learned one trick for text that is very sketchy, which is a problem with ScotlandsPeople images. this is because they have saved them at tifs but the files at bitmaps, i.e. black or white but no greys. To get some of those, check the mode to black and white and then use a simple Blur (I like Blur More on my old Photoshop version). Then go in and darken some of the grey tones. Amazing how it connects the dots.
Loved this walkthrough. One thing I’ve noticed while working with really old family photos is that sometimes the damage isn’t just fading or creases but actual file-level corruption, especially with scanned images that have been stored for years. In those cases, Photoshop tools don’t always open the file cleanly. When that happens, running the image through a repair tool first can save a lot of frustration. I’ve had a few scans open again after using Stellar Repair for Photo, and only then could I clean them up in my editor. It won’t replace proper restoration work, but it’s handy when a file refuses to load or shows broken sections.
ReplyDelete