18 August 2020

Improving on the MyHeritage Photo Enhancer

I'm not a fan of colorization. As a college film student, I learned to appreciate the clarity and beauty of black and white images. When Turner Classic Movies began colorizing old movies, I was horrified.

Now MyHeritage.com has an amazing Photo Enhancer. You may have seen other genealogy fans sharing their results. I still bristled at the colorization, but some of their results looked very realistic.

I decided to give the MyHeritage Photo Enhancer a try. Note that I do not have a paid account with MyHeritage. You can do this with a free account.

What struck me right away was the mind-blowing clarity. I've been a Photoshop user since before it was Photoshop. (Does anyone remember Aldus PhotoStyler?) Photoshop has sharpening tools that work well. But I can't come close to the magic that MyHeritage has harnessed.

I was ready to embrace colorization to gain that sharpness—if I could get good color results. What I'm finding is that the tool overdoes the color. It's too saturated and un-lifelike. But I can fix that in Photoshop.

Because I need Photoshop for my work, I pay a $10.80/month subscription fee. You can go to the CNET website to search for low- or no-cost photo editing tools.

MyHeritage Photo Enhancer sharpened and colorized my grandfather's photo; I edited the color.

I have this World War I-era photograph of my grandfather and his buddies. I ran it through the MyHeritage Photo Enhancer and got tremendous clarity. But the men's faces were too orange and their gray uniforms looked purple.

I used Photoshop's Color Balance and Hue/Saturation tools to adjust the photograph. I wanted the uniforms to look gray and the faces lifelike.

Always work from a copy of the colorized photo so you can compare the before and after.

The MyHeritage tool brought this photo to life! I took the redness out of great grandmom's face.

There's also a powerful Healing Brush tool in Photoshop. I've had great luck using it to remove scratches, creases, stains, and tears in old photos. It makes decisions about what should be in that spot by looking at what's nearby. I restored a whole section of wallpaper in a photo of my grandfather with the Healing Brush.

Whether you use Photoshop or another program, these free Photoshop tutorials can teach and inspire you. Wouldn't you love to fix those one-of-a-kind, precious family portraits?

14 August 2020

Get into a Groove to Fortify Your Family Tree

We each have the ability to be thorough, organized genealogists. But we don't always have the time.

I'm going to show you my multi-step process (accent on the multi). I follow this routine for each document image I add to my family tree.

First, let me explain what prompted me to write about how I get my genealogy groove on.

I found 4 notes in my genealogy task list that I wrote a long time ago. These notes list details about birth records I need to add to my family tree. The notes include the person's name, birth date and place, and the URL of the document image.

When I compared the notes to my tree, I realized I had added the facts to each person, but not the birth record images. I must have been in a hurry that day.

Now that I'm looking at those notes again, it's time to complete each task and delete those notes from my task list. Here's what I need to do for each one (deep breath):

  1. Go to the birth record stored on my computer. I have tons of Italian vital records downloaded from the Antenati website. I file them in nesting folders by province, town, and year/type of record.

    When you add to your task list, be specific so you can complete the task.
    When you add to your task list, be specific so you can complete the task.
  2. Crop the image and boost its contrast in Photoshop if needed. Export the cropped image to my "working" folder. This makes my in-progress images easy to find.

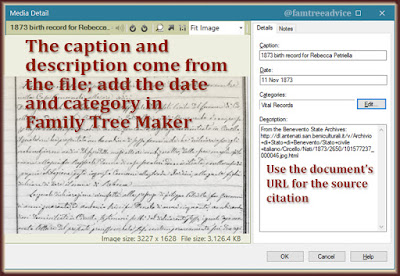
  3. Edit the properties of the image file to include a title and comments. The title might be "1835 birth record for [Full Name]". The comments might be: "From the Benevento State Archives: [full URL of original image]". These facts stay with the image and get pulled into my family tree program.

    Adding information to the image itself helps in your tree and when you share the file.
    Adding information to the image itself helps in your tree and when you share the file.
  4. Attach the image to the right person in Family Tree Maker and make it their profile image. (I don't have photos of my ancestors beyond most of my great grandparents.)

  5. Edit its properties to include the date on the document. Note: I don't put the date in the file's properties because it doesn't carry over into my software.

    Not only do the image's facts get pulled into your tree, you can use them to create a source citation.
    Not only do the image's facts get pulled into your tree, you can use them to create a source citation.
  6. Select a document category. (I save birth, marriage, and death records as "Vital Records".) This may be a Family Tree Maker thing only.

  7. Add each fact provided by the document to the person. That may include their full name, birth date, baptism date, place of birth, etc.

  8. Add a source citation to each of these facts. The URL I attached to the image is critical to the source citation.

  9. Add mention of this document to my Document tracker. I add a line to my spreadsheet for this person, if they aren't already in there. If I have an 1835 birth record image, I'll add this to the Birth column: "1835 (cert.)". The "(cert.)" tells me I have an image of the certificate. It isn't a fact pulled from somewhere else. It's the actual birth certificate.

  10. Move the image from my "working" folder to my "certificates" folder. It sits there until I do my weekly computer backup. After the Sunday morning backup, I move it to the right sub-folder of "certificates". I have so many certificates that I break them up into alphabetical groups.

OK, now I see why I didn't have time to do this when I found the records.

Despite all the steps, I'm happy to do each one. I know that when I'm done, I'm completely done, with no loose ends dangling. It's all a matter of getting into a groove, making each step a part of your routine, and enjoying the results.

Pressed for time? You can either:

  • Leave yourself a detailed note in your task list, or
  • Get that document as far as your "working" folder (step 2 or 3) and come back to it later.

Think of yourself as a genealogy manufacturing production line. You are cranking out a piece of perfection.

11 August 2020

Keep Track of Your Genealogy Theories and Tasks

I like to work from text-file task lists. I started doing this in my corporate job so I can easily re-prioritize my to-do list. If a task has a deadline, its line begins with the due date: AUG 11, AUG 25, etc. I keep those items in order so I never miss the deadlines.

This blog is about using business sensibilities and efficiencies in your genealogy research. So it makes perfect sense to use the task list idea in your family tree work.

There's no need for special software, although many of you may use Evernote or OneNote. You only need a text editor, like Notepad on a Windows computer or TextEdit on a Mac. I use Notepad++ because I can have a bunch of files open at once and include some HTML code when I need to.

Use your task list to keep track of:

  • Where you left off with a search for an ancestor.
  • Your theory about a particular ancestor and where you might find them.
  • A problem you're trying to solve, like an unreadable last name or conflicting birth dates.
  • Your progress on any of your annual genealogy goals.
  • Links to online pages that may be helpful to you, and a note about why.
  • Reference books you want to find or buy.

For each line item, it may help you to type last names in ALL CAPITAL LETTERS. Once you have several entries, you can organize them by type, or by branch of your family tree.

Keep a running, constantly updated list of what you're working on in your genealogy research.

Here's an example. I found an unusual 1809 death record for my 5th great grandfather, Vincenzo Liguori. I found it in the 1840 marriage documents of his grandson, my 3rd great grandfather. The problem is:

  • The document doesn't actually say he died in their hometown of Circello
  • It doesn't mention his parents or wife…only his son, my 4th great grandfather
  • It isn't included in the 1809 death records.

I need to find another version of the document in another set of marriage records. I'm missing the names of Vincenzo's grandchildren born before 1809. (Civil record keeping began in 1809 in my part of Southern Italy.) I need to search marriage records for anyone with the name Liguori.

I added this line to my task list:

  • Did Gregorio LIGUORI [Vincenzo's son] & Apollonia Grazia Caruso have a child before 1809? Search Circello marriages starting in 1825 for other Liguori children. (I'm up to 1841.)

The end of that line item tells me where I left off. That's critical to your task list.

Here's another example. My 5th great grandmother Francesca d'Andrea is a dead end. I don't know when she died or who her parents were. I think she came from Pesco Sannita because I see the name d'Andrea on lots of documents from that town. I started looking for people who might be her siblings.

I added this line to my task list:

  • Francesca d'ANDREA's parents may be Giuseppe and Rosa Salamone or Antonio and Vincenza Orlando. That's based on other d'Andrea death records. Search for supporting marriage documents. (Not started.)

Finally, I've been working on a branch of my family tree with the last name Consolazio from Santa Paolina. My closest Consolazio relative is my 2nd great grandmother. I've been renaming the town's vital records files to include the names on the documents. Then I'm trying to fit all the people named Consolazio into my family tree.

I added this to the task list:

  • I'm up to 1828 births reviewing CONSOLAZIO records.

Keep your task list open each time you sit down to work on your family tree. Consult it often. When you finish a task, add a note to the right person in your family tree, explaining how you learned this fact.

The notes in your task list are great reminders of what you've already done to solve a problem. Re-reading these notes may trigger that "aha!" moment and help you finally solve that puzzle.