We each have the ability to be thorough, organized genealogists. But we don't always have the time.
I'm going to show you my multi-step process (accent on the multi). I follow this routine for each document image I add to my family tree.
First, let me explain what prompted me to write about how I get my genealogy groove on.
I found 4 notes in my genealogy task list that I wrote a long time ago. These notes list details about birth records I need to add to my family tree. The notes include the person's name, birth date and place, and the URL of the document image.
When I compared the notes to my tree, I realized I had added the facts to each person, but not the birth record images. I must have been in a hurry that day.
Now that I'm looking at those notes again, it's time to complete each task and delete those notes from my task list. Here's what I need to do for each one (deep breath):
- Go to the birth record stored on my computer. I have tons of Italian vital records downloaded from the Antenati website. I file them in nesting folders by province, town, and year/type of record.

When you add to your task list, be specific so you can complete the task. - Crop the image and boost its contrast in Photoshop if needed. Export the cropped image to my "working" folder. This makes my in-progress images easy to find.
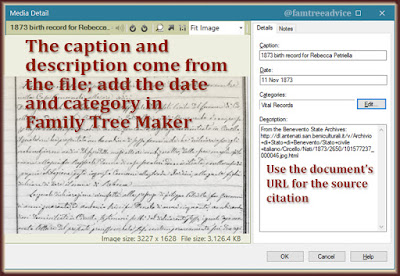
- Edit the properties of the image file to include a title and comments. The title might be "1835 birth record for [Full Name]". The comments might be: "From the Benevento State Archives: [full URL of original image]". These facts stay with the image and get pulled into my family tree program.

Adding information to the image itself helps in your tree and when you share the file. - Attach the image to the right person in Family Tree Maker and make it their profile image. (I don't have photos of my ancestors beyond most of my great grandparents.)
- Edit its properties to include the date on the document. Note: I don't put the date in the file's properties because it doesn't carry over into my software.

Not only do the image's facts get pulled into your tree, you can use them to create a source citation. - Select a document category. (I save birth, marriage, and death records as "Vital Records".) This may be a Family Tree Maker thing only.
- Add each fact provided by the document to the person. That may include their full name, birth date, baptism date, place of birth, etc.
- Add a source citation to each of these facts. The URL I attached to the image is critical to the source citation.
- Add mention of this document to my Document tracker. I add a line to my spreadsheet for this person, if they aren't already in there. If I have an 1835 birth record image, I'll add this to the Birth column: "1835 (cert.)". The "(cert.)" tells me I have an image of the certificate. It isn't a fact pulled from somewhere else. It's the actual birth certificate.
- Move the image from my "working" folder to my "certificates" folder. It sits there until I do my weekly computer backup. After the Sunday morning backup, I move it to the right sub-folder of "certificates". I have so many certificates that I break them up into alphabetical groups.
OK, now I see why I didn't have time to do this when I found the records.
Despite all the steps, I'm happy to do each one. I know that when I'm done, I'm completely done, with no loose ends dangling. It's all a matter of getting into a groove, making each step a part of your routine, and enjoying the results.
Pressed for time? You can either:
- Leave yourself a detailed note in your task list, or
- Get that document as far as your "working" folder (step 2 or 3) and come back to it later.
Think of yourself as a genealogy manufacturing production line. You are cranking out a piece of perfection.
No comments:
Post a Comment
You may leave an anonymous post if you have no Google account. The author screens each comment for spam before it appears here. So don't bother to spam.