31 August 2018

How to Make the Most of an Intriguing Genealogy Lead

How I turned a random lead into a documented relative.

I'm lucky to have such an uncommon maiden name. Nearly everyone named Iamarino can trace their roots back to the same small town in Italy.

Recently, an Iamarino from Brazil went to visit our Italian ancestral hometown. She visited 3 months after I did. I saw her photos on Facebook and recognized all the places I'd seen on my trip.

I've known about this particular Brazilian Italian cousin for 10 years. A mutual friend told me about her ancestry. Seeing her photos reminded me how much I want to learn about the Iamarinos who left Italy for Brazil.

That's why I'm diving into some Brazilian records on FamilySearch.org. I've chosen a database called "Brazil, São Paulo Immigration Cards, 1902–1980". I've entered only the last name Iamarino in the search area.

Document 1: Immigration Card

There's only 1 result, but it's intriguing to me. The photo of this 80-year-old widowed man, whose mother was named Iamarino, is calling to me.

A search for my maiden name brought up this man. What more can I learn about him?

I don't read Portuguese, but some things are clear. Miguel Basiloni is an illiterate farmer who was born in Colle Sannita (misspelled on the card) on 2 July 1895. His parents were Antonio Basiloni and Maria Iamarino.

My experience with Colle Sannita records tells me "Miguel's" real last name is Basilone, ending in an e. And I'm sure his given name is Michele, the Italian version of Miguel.

So I'm going to search my collection of Colle Sannita vital records and my family tree. Let's see what I can learn about this man.

Document 2: His Birth Record

The 1895 birth record of the man in the photo.

Michele Basilone was actually born on 1 July 1895 in Colle Sannita. His father Antonio was a 26-year-old farmer. His mother was Marianna (not Maria) Iamarino. Let's go find his parents' births, shall we?

I'll search the birth indexes for Antonio Basilone and Marianna Iamarino in and around 1869.

Document 3: His Father's Birth Record

There is no Antonio Basilone in the 1869 index, but there's a Libero Antonio Pasquale Basilone. I've got to take a look at him.

Michele's father's birth record includes his marriage to Michele's mother.

There's the proof I need in the column of his birth record. Libero Antonio Pasquale Basilone married Marianna Iamarino on 28 August 1890. Now I have his:
  • Birth date: 15 May 1869
  • Father's name: Michele, the son of the late Pietrangelo
  • Mother's name: Andreana Paolucci, daughter of Giovanni
Document 4: His Mother's Birth Record

I didn't have to go far to find Marianna Iamarino's birth record in 1870. Finally I have a connection! Marianna's parents are already in my family tree. She is my 3rd cousin 3 times removed.

That makes Michele, the somber old man in the photo, my 4th cousin twice removed.

Michele's mother's side of the family was already in my family tree.

I'm a little worried because Marianna's birth record doesn't mention her marriage. So I'll keep checking the surrounding years. It's possible that the Marianna born in 1870 died, and another was born and married Libero Antonio.

My cousin who went to Brazil.

OK, there are no more Mariannas, so I believe I've got my gal. Marianna was not a common name in this town. Ironically, it was my great grandmother's name, but she's from a neighboring town.

More Documents

I'm sure I can find Michele's siblings by searching the birth records starting in 1891.

I may be able to find Michele's marriage record, but only if he married after 1930. There are marriage records available from 1931–1942.

Every evening, with the Yankees playing on the TV, I sit here at my computer. I pick a genealogy project for the evening. Michele was an unexpected project that I'm feeling really good about.

Michele Basilone looks very sturdy and solid for 80 years old. I'm happy to see his face and know that my first search in the Brazilian genealogy records gave me my 4th cousin twice removed. Olá, Miguel.

28 August 2018

6 Steps to Make Your Family Tree 10 Times Better

Ever wish you could look over another genealogist's shoulder to see how she does things?

Look at this. I've decided to do everything the right way from the get-go so I don't have to double back and fix or add facts. As I was methodically tackling one item on my genealogy to-do list this weekend, it struck me. There are so many steps to this process!

Does anyone else go to this much trouble? Let's find out. Take a look at what I was doing so thoroughly this weekend.

The Goal: Replace Several Bad Document Images with Good Ones

Years ago I viewed and transcribed every vital record (1809-1860) from my grandfather's Italian hometown. I used some poor-quality microfilm viewers at 2 Family History Centers.

At the first FHC, I used their computer to capture several of the images as jpg files. But they weren't very clear. At the second FHC I took iPhone pictures of some documents projected on the surface of the microfilm viewer. Terrible, ghastly quality.

Awful, pitiful old image vs. new, glorious image.

Now there are excellent, high-resolution images of those same documents available online. I downloaded the entire town (and others) to my computer to make my research easy. Now I can replace those crummy old images in my family tree with excellent ones.

But I'm also:
  1. cropping the images in Photoshop
  2. editing each image's properties to include a title and the source URL of the image
  3. deleting the bad image from Family Tree Maker's media library
  4. adding the new image and editing its date and category fields
    • the date is the date of the event
    • the category is Vital Records
  5. recording each document in my document tracker spreadsheet.
The Steps

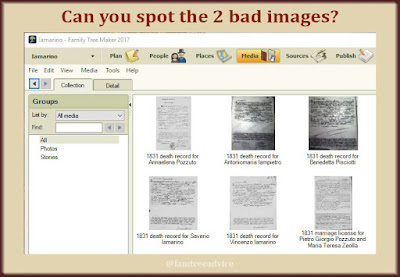
1. Identify a bad image. The Media tab in Family Tree Maker makes it pretty obvious which documents are the bad ones. So I can pick any one and dive in.

Hint: The bad images are dark and fuzzy looking.

Organize your digital files logically, and things are easy to find.
Organize your digital files logically,
and things are easy to find.

2. Find the good image. I've got the Italian vital records carefully organized on my computer. My subject, Benedetta Pisciotti, was from Baselice. So I go straight to the Baselice town folder. She died in 1831, so I go to the 1831 deaths folder. I know the date and I can see the document number in the original. This makes it easy to find the image I want.

3. Crop the image and name it appropriately. If there's more than one document in the image or it's crooked, I crop it in Photoshop. I save it in the proper folder and name it in my usual style: LastnameFirstnameEventYear, so PisciottiBenedettaDeath1831.jpg.

Using Photoshop to crop out the other document and the huge black border.

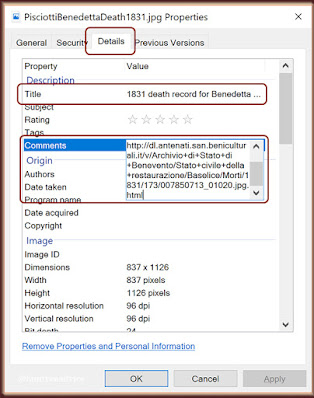
4. Annotate the image's properties. In each of my folders of Italian documents I have a text file called "URL format". It contains the format of the URLs where these documents came from. For example: 007850713_00000.jpg. I simply replace the last 5 zeroes with the last 5 digits of the image's file name. Now I right-click the cropped image and choose Properties, then the Details tab. I edit the Title field ("1831 death record for Benedetta Pisciotti") and the Comments field ("From the Benevento State Archives" and the image's original URL).

These annotations stay with your image file and are pulled into your family tree software.
These annotations stay with
your image file and are
pulled into your
family tree software.

5. Replace the image in Family Tree Maker. To remove the old image from Family Tree Maker's media library, I detach it from Benedetta and put it in the trash. Now I drag and drop the new image into Benedetta's Media tab. The image retains the title and comments I gave it in step 4. But I also want to enter the date of the event and select the Vital Records media category. When I synchronize, all these details are on Ancestry.com for potential cousins to see.

Check the boxes and click "Unlink Selected" in Family Tree Maker to remove the old image.

Don't skimp on the annotations.

6. Update tracking spreadsheet. Finally, I record Benedetta's death in my spreadsheet of all documents. I add a line for Benedetta and put "1831 (cert.)" in the Death column to show that I have a copy of the certificate of her death in 1831.

Updating my inventory at that moment is critical to being thorough.

Detailed, yes. But it's a process that becomes second nature.

The Result

When I complete this project, I'll be rid of those dark, fuzzy document images. And I'll have fully annotated images. They'll have a descriptive title, date, category, and source citation.

I think it's worth all the steps and the juggling of File Explorer, Photoshop, Family Tree Maker and Excel.

Don't you think your tree is worth this kind of effort?

24 August 2018

3 Unique, Key Facts about Every U.S. Federal Census

Download this free diagram of U.S. census changes from 1790 to 1940.

Here's an infographic to show you the states or territories included in each U.S. Federal census, 1790–1940. Knowing these facts can save you from trying to find your ancestor in a state that didn't yet exist.

After the first census box for 1790, each year in the infographic shows:
  • The new states and territories counted that year.
  • New questions asked and facts recorded that year.
It's interesting to see the increasing detail gathered from census to census.

You can download this graphic as a PDF. I've also created a printer-friendly version in black and white for letter-size paper (8½" x 11").

Diagram of U.S. Census Changes from 1790 to 1940

21 August 2018

How to Back Up Your Family Tree Files Automatically

This one decision is my biggest genealogy time-saver.

Last December I wrote my list of genealogy goals for 2018. I'm making progress, but at least 2 of my goals will spill over to next year's list.

That's why I'm so happy, week after week, about my decision to back up my family tree files automatically. Well, automatically and also manually, because two backups are better than one.

There are free storage options and paid storage options. I'll list several of them below, but first: Automation.

I've decided to use my Microsoft OneDrive cloud storage for my genealogy files. All my files are still stored locally on my computer. But they're mirrored and continuously backed up to OneDrive.

My genealogy files are backed up instantly, automatically.

Continuously backed up means:
  • My document tracker spreadsheet is always saved on my computer and the cloud.
  • Each census sheet or birth record I download to add to my tree is backed up to the cloud at the same time.
  • When I work in Family Tree Maker and make a backup file, the tree and the backup are also saved on my computer and the cloud.
I don't have to take an extra step to back them up. But, I also have an external, 1 Terabyte drive. Once a week I look at all my genealogy folders on my computer, sorting them by date. I copy anything with a newer date than my last backup to the external drive.

My OneDrive files, accessible to me online, anywhere.

It's fast, efficient and safe. Plus, having your files online, in your password-protected storage area, means you can access your files from anywhere.

I like syncing a portion of my computer with OneDrive because the files are still on my computer. They'd still be there even if I had no internet access.

Here are several options for online storage that you can use:

Google Drive is another automatic backup option.
Google Drive is another
automatic backup option.

OneDrive

I'm a monthly subscriber to Microsoft Office 365. I need it for work, and the cost is low enough that I'll keep subscribing even after I've retired. My subscription includes 1 Terabyte of storage space. Even with all my genealogy files on OneDrive, I'm only using a tiny portion of my Terabyte—about 182 GB. You can get 5 GB of free storage space or 50 GB for $1.99/month. Visit OneDrive to learn more.

Google Drive

You can also use your free Google account for automatic backup. Google Drive lets you synchronize folders with your online storage space automatically. It works with your Windows or Mac computer, and your Android or iOS device. Google Drive gives you 15 GB of storage for free. For $1.99/month, you can buy 100 GB of storage. Visit Google Drive to learn more.

iCloud

Do you have an iPhone or iPad? If so, you have 5 GB of iCloud storage. You can access it from your computer as well as your devices. That's not a lot of space, but you can pay for more storage. The cost depends on your country and how much space you want. Visit iCloud to learn more.

Dropbox

Free storage with Dropbox is limited to 2 GB. You can buy 1 Terabyte of online storage space for $9.99/month. I like to use Dropbox for file sharing. I've posted fill-in-the-blanks census sheets there and other PDFs to share with specific people. Visit Dropbox to learn more.

Your Internet Provider

If you have an internet connection in your home, your service provider may offer you some free storage space. Check with your provider.

You can see that the paid plans are very competitive with each other. With OneDrive, I'm basically paying for that 1 Terabyte and getting Word, Excel, PowerPoint and more for free.

No excuses now. Even if you split your files among different free storage spaces, it's time for you to create your back up plan.

17 August 2018

The Single Best Technique for Reading Old Genealogy Records: Immersion

You may have started dabbling in genealogy years ago or months ago. Think back to the first documents you found for your family. What was the toughest hurdle for you?

For most people, it's the handwriting—and for some of us, the handwriting in a foreign language.

Do not let that slow you down! Every day I see people requesting document translations in Facebook genealogy groups. And there are always people ready to jump in to help. I'm one of them.

But we don't type out the translation because we're fluent in the other language. Or because we were raised to read and write in an old-fashioned style.

No. We can read and understand these birth, marriage and death records, census forms, ship manifests and more because we swim in them every day.

I've written articles about understanding foreign-language documents before. You'll find them at the bottom of this article. Much like "The Blues Brothers", I'm "on a mission from God." My mission: To throw you into the old-fashioned and foreign handwriting water and show you that you can swim!

Ten years ago this document was a ball of confusion. Now it's all painfully obvious to me.

A few days ago I realized the power of the immersion technique. I was hunting through some very old email I'd saved, trying to find the source document for some people in my tree. In a 10-year-old email, I found an 1886 parish marriage document for someone with my maiden name.

My reply to the email surprised me. I asked my friend, "Why are there so many names on this document? What does it all mean? Who are they all?"

As I look at the document now, it's perfectly obvious who they all are. They are the groom and his parents, the bride and her parents, and the witnesses.

Why was I confused by that? The answer is simple. Ten years ago I hadn't seen any 19th-century Italian marriage documents. Now I've viewed and transcribed thousands of them.

Familiarity is the main thing you need. You do not need to know the translation for each word on the page. You need to know the key words for things like:
  • born
  • died
  • son/daughter
  • husband/wife/widow
  • dates/numbers
Below are 4 articles with links to resources for helping you understand those old documents.

The single best technique for reading old genealogy documents is to expose yourself to lots and lots of them. Looking for your 2nd great grandmother's birth record? Look at the other documents before and after hers. Use them to help you figure out that one word or letter you cannot decipher.

You'll also see for yourself which names are common in the town. After you see it written 10 times, that difficult last name becomes so easy to pick out.

The obstacle of foreign languages and old-fashioned handwriting will disappear.

Use the tools available to you. Spend time looking closely at similar documents. Familiarity is your best teacher. You can do this!

14 August 2018

This Genealogy Report Shows You What's Missing

Update: Family Tree Analyzer is now available for Mac.

How would you like a tool that shows you exactly which census forms you haven't found for each person in your family tree?

Sound like a time-saver? You'd better believe it is. Let's take a look at the Census Report tool in the free software program, Family Tree Analyzer (FTA). (See their website for the free download and their Facebook page for support.)

This is a simple process of (1) open file, (2) run report, (3) work with your results.

Before You Start
An approximate birth year and country of birth will give you the best results.
An approximate birth year and country of
birth will give you the best results.

Learn from my experience and get better results:
  • Enter an estimated birth date for everyone in your tree. When you don't know someone's date, make them about 25 years older than the oldest child you've found for them. There's a big difference when searching for someone born in 1850 vs. 1900.
  • Enter a country of birth and death whenever possible. Say you've researched several generations of a family and they stayed in one area. If someone's children never emigrated, assume the person was born and died in that country. Add a note that this is not verified.

Now the FTA Census Report will be much smarter and you'll need to do very little editing of your Census Report.

Open Your Data File

Once you install FTA, all you need is your tree's latest GEDCOM file (see the definition). Check your software's File menu for an Export option. If your tree is on Ancestry.com, but not on desktop software, go to your Tree Settings online. Find the green Export tree button. Some websites believe in one shared tree. That means you don't have full control of your tree, and you cannot download a GEDCOM. The control freak in me can't imagine going that route.

Launch FTA and open your GEDCOM file.

Run the Census Report

To run a report showing which census records you're missing:

Make 2 selections, and click to run the report.
Make 2 selections and click "Show Missing from Census" to run the report.

  1. Click the Census tab at the top.
  2. Check the boxes for the Relationship Types you'd like to include in your report:
    • Direct Ancestors
    • Blood Relations
    • Related by Marriage
    • Married to Blood or Direct
    • Unknown
  3. Choose a census report from the Census Date menu. You'll find:
    • UK Censuses from 1841–1911
    • the UK National Register of 1939
    • Ireland Censuses for 1901 and 1911
    • US Federal Censuses from 1790–1940
    • Canadian Censuses from 1851–1921
    • Scottish Valuation Rolls from 1865–1925
  4. Click the button labelled Show Missing from Census. Your report will open in a new window.
Your report is ready to export to Excel.
Your report is ready to export to Excel. Notice the status line at the bottom of the report. You can double-click an entry from this report view to go to FamilySearch and find the census you're missing.

FTA is smart. It knows if someone in your tree was alive and living in the right country for a particular census. By default, it doesn't search for anyone over the age of 90, but you can change that.

Now that you have the report, click the Excel icon at the top of the report window. Save the file to your computer in the default CSV (Comma-Separated Values) format. Now go back to step 1 and repeat the process for each census year you need.

Analyze Your Results

Now it's time to work with the data. I found a small number of people who didn't belong in this report. So before you start working through people one line at a time, let's check a few things.

To work with your report more easily, hide the spreadsheet columns you don't need right now. To hide a column, click the letter at the top of the column, like G. This will select the whole column. Then right-click the selected column and choose Hide from the menu.

The most important columns to keep visible are:
  • CensusName (a married woman's maiden name is in parentheses)
  • Age
  • BirthDate
  • BirthLocation
  • DeathDate
  • DeathLocation

The first people I'll look for have a birth location and death location in another country. I see only a couple of people who match this description. The first one is a familiar name: Domenico Sarracino. I know he never came to America, so I can remove him from this report.

Next I want to remove everyone with an unknown birth and death date. I know that in my family tree, these are most likely relatives of relatives. I might know nothing beyond their names. They shouldn't be my focus, so I'll remove them from my spreadsheet.

Finally, I'll sort the entire spreadsheet by the CensusName column. Now I can scroll through the names and remove duplicates. I found about 15 people who appeared to be duplicates with the same name and birth date.

One more step. For each name in the spreadsheet, I'll check their entry in my family tree. I quickly spot some more who I know never came to America.

The reason FTA doesn't know they never left Italy is that my birth and death dates don't always say they were born or died in Italy. I didn't want to make that assumption, but now I think I'd better. When it's a safe assumption, I'll put in the country and add a note that this is not confirmed.

More lines deleted.

Now I have a list of 120 people who need me to find them in the 1900 U.S. Federal Census. That may sound like a lot of people, but my family tree has almost 20,000 people. It's about 0.6% of my total tree. That sounds manageable. And finding those missing census forms will make my tree that much more valuable.

I'm ready to begin searching for those census sheets. I'll whittle down my list as I go, keeping track of my progress. Then it's on to the census reports for 1910, 1920, 1930 and 1940.

Go Fill in the Blanks

Now you're ready to make targeted searches for those missing census sheets. Family Tree Analyzer is a must-have if you want to make your family tree your legacy.

Want a cheap thrill? When you're done, create a new GEDCOM and run the report again. Look at your results!